Nginx로 무중단 배포하기 - Script 추가 (Maven)
by 뚜부니이전 글을 아직 보시지 않았다면 읽고 와주세요.
Nginx로 무중단 배포하기
무중단 배포 구조 무중단 배포는 여러 방법이 있는데, 그중 Nginx를 이용해 내부 포트를 바꿔 무중단 배포를 하는 방식에 대해 알아보았습니다. 테스트를 위해서는 1대의 Nginx와 2대의 Spring Boot jar
subin-0320.tistory.com
배포를 조금 더 쉽게 할 수 있도록 배포 스크립트를 작성해보려고 합니다!
healcheck를 위해 Spring Boot 프로젝트에 actuator 설정을 추가합니다.
appliction-common.properties
# actuator setting management.endpoints.web.exposure.include=health # /application/health-check 로 path 변경 management.endpoints.web.base-path=/application management.endpoints.web.path-mapping.health=health-check # health에 대한 자세한 정보를 보고 싶은 경우 아래 설정을 추가하면 됩니다. management.endpoint.health.show-details=always
그리고 actuator dependency도 추가해줍니다.
pom.xml
... <dependencies> <dependency> <groupId>org.springframework.boot</groupId> <artifactId>spring-boot-starter-actuator</artifactId> </dependency> ... </dependencies> ...
이전에 작성했던 test code에 HealthCheck를 위한 Test를 해줍니다.
public class WebRestControllerTest { @Autowired private TestRestTemplate restTemplate; ... @Test public void HealthCheck() { //when Map response = this.restTemplate.getForObject("/application/health-check", Map.class); String status = String.valueOf(response.get("status")); //then assertThat(status).isEqualTo("UP"); } }
그다음 프로젝트에 대한 jar 파일을 생성해서 서버에 올려야 하는데, 그전에 서버에 build , jar라는 이름의 폴더를 생성합니다. 그리고 jar 파일을 ec2 서버의 build 폴더에 올립니다.
scp -i /Users/subin/.ssh/nginx-blue-green.cer /Users/subin/WorkSpace/nginx-blue-green-deployment/target/build/demo-0.0.1-20220423-232933.jar ubuntu@13.125.245.196:/home/ubuntu/server/build/

배포 스크립트 작성
deploy.sh
먼저 배포를 위한 스크립트를 작성합니다.
#!/usr/bin/env bash BASE_PATH=/home/ubuntu/server/ BUILD_PATH=$(ls $BASE_PATH/build/*.jar) JAR_NAME=$(basename $BUILD_PATH) echo "> Build name : $JAR_NAME" echo "> Copy build file" DEPLOY_PATH=$BASE_PATH/jar/ cp $BUILD_PATH $DEPLOY_PATH echo "> Check the running Set" CURRENT_PROFILE=$(curl -s <http://localhost/profile>) echo "> $CURRENT_PROFILE" # Find idle set. if [ $CURRENT_PROFILE == set1 ] then IDLE_PROFILE=set2 IDLE_PORT=8082 elif [ $CURRENT_PROFILE == set2 ] then IDLE_PROFILE=set1 IDLE_PORT=8081 else echo "> Failed to find profile. Profile: $CURRENT_PROFILE" echo "> Allocate set1. IDLE_PROFILE: set1" IDLE_PROFILE=set1 IDLE_PORT=8081 fi echo "> Change application.jar" IDLE_APPLICATION=$IDLE_PROFILE-servertest.jar IDLE_APPLICATION_PATH=$DEPLOY_PATH$IDLE_APPLICATION ln -Tfs $DEPLOY_PATH$JAR_NAME $IDLE_APPLICATION_PATH echo "> Check $IDLE_PROFILE PID" IDLE_PID=$(pgrep -f $IDLE_APPLICATION) if [ -z $IDLE_PID ] then echo "> No application is running." else echo "> kill -15 $IDLE_PID" kill -15 $IDLE_PID sleep 5 fi echo "> $IDLE_PROFILE deployment." nohup java -jar -Dspring.profiles.active=$IDLE_PROFILE,common $IDLE_APPLICATION_PATH & echo "> Start $IDLE_PROFILE health check after 10 seconds." echo "> curl -s <http://localhost>:$IDLE_PORT/application/health-check" sleep 10 for retry_count in {1..10} do response=$(curl -s <http://localhost>:$IDLE_PORT/application/health-check) up_count=$(echo $response | grep 'UP' | wc -l) if [ $up_count -ge 1 ] then echo "> Success health check." break else echo "> The health check response is unknown or the status is not 'UP'." echo "> Health check: ${response}" fi if [ $retry_count -eq 10 ] then echo "> Failed health check." echo "> Terminate the deployment without connecting to Nginx." exit 1 fi echo "> Health check connection failed. Retry..." sleep 10 done
스크립트 작성 후 실행시켜보면 정상적으로 배포가 이루어지는 것을 확인할 수 있습니다.
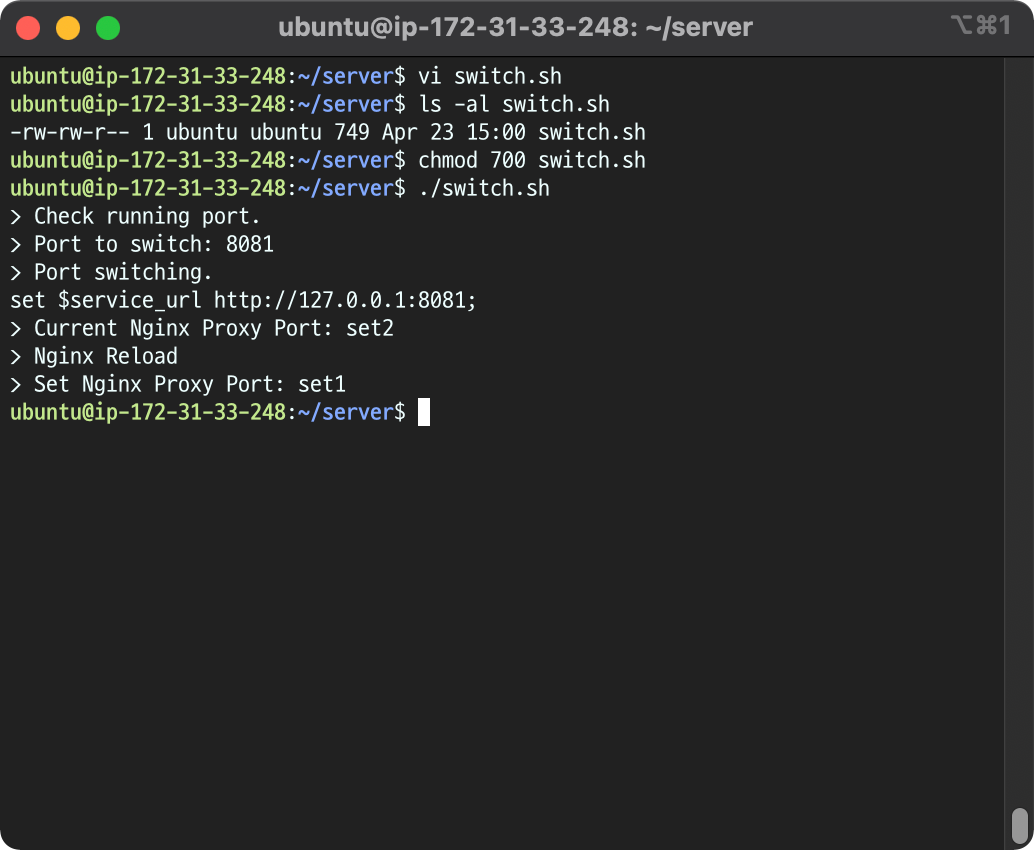
switch.sh
배포가 완료되면 nginx가 프록싱하는 port를 변경되어야 하므로, 그와 관련된 스크립트를 추가합니다.
#!/usr/bin/env bash echo "> Check running port." CURRENT_PROFILE=$(curl -s <http://localhost/profile>) # Find idle set. if [ $CURRENT_PROFILE == set1 ] then IDLE_PORT=8082 elif [ $CURRENT_PROFILE == set2 ] then IDLE_PORT=8081 else echo "> Failed to find profile. Profile: $CURRENT_PROFILE" echo "> Allocate 8085." IDLE_PORT=8081 fi echo "> Port to switch: $IDLE_PORT" echo "> Port switching." echo "set \\$service_url <http://127.0.0.1>:${IDLE_PORT};" |sudo tee /etc/nginx/conf.d/service-url.inc PROXY_PORT=$(curl -s <http://localhost/profile>) echo "> Current Nginx Proxy Port: $PROXY_PORT" echo "> Nginx Reload" sudo systemctl reload nginx sleep 10 PROXY_PORT=$(curl -s <http://localhost/profile>) echo "> Set Nginx Proxy Port: $PROXY_PORT"
코드를 실행시키면 아래와 port가 8082에서 8081로 변경되는 것을 확인할 수 있습니다.
이제 deploy.sh만 실행시켜도 switch.sh도 함께 수행되도록 deploy.sh 코드 맨 하단에 아래 코드를 추가해줍니다.
echo "> Switching" sleep 10 /home/ubuntu/server/switch.sh
🔗 참고

블로그의 정보
개발하는 두부
뚜부니